Tuesday, August 23, 2011

Pinwheels Tutorial

I have been having FUN!!! I've decided that I LOVE making pinwheels! There is so much one can do with those little triangle-y square doo-dads, and they are turning out to be the perfect compliment to finish out the edges of the Bargello pillow quilt.

Here is a photographic walk-through on how I make pinwheels, taking hints from various sources. I actually DID figure out the math this time, and was spot-on, so very proud of myself there. (pat, pat, pat on the back) Only measured the length of each square side before cutting the initial strips-- none of that 'hypotenuse' stuff, believe me. (My 7th grade son would be embarassed about my lack of math retention...)


Step 1: Cut even-sized strips of alternating contrasting colors, then cut into squares. (Mine are 3 1/4", to make a 5"X5" finished pinwheel)

Step 2: Face one of each color square, right-sides together, as exact from tip to tip as possible. With fabric pencil or pen, draw across the square diagonally. (Diagon Alley??) Now sew with your 1/4" mark on the presser foot lined up with the drawn line, going down both sides of the line. You are creating two sets of joined triangles per each square.

Step 3: Cut down the line from corner to corner of each square.


Step 4: Press the triangles open on 'high' setting of iron, if working with cotton. It takes four of these joined squares to make one pinwheel. Eight total triangles.


Step 5: Cut off overhanging tips and threads to neaten squares. At this point, I arrange the pinwheels just to keep my mind straight on how to pin them together.


Step 6: Pin the correct sides together, making sure that they are congruent with the pattern your pinwheel needs. Once you get the first set correct, they are all the same after that, they simply get rotated into position. The pins not only hold the correct pieces together, but are also to remind me which sides I am sewing together. I also sew them at this point one after another, feeding the next after coming off the last, and then cut them apart when finished.


Step 7: Press your rectangles open. The 'point' of your pinwheel half should fall about 1/4" short from the edge-- this is exactly what you want when you go to sew the two sides together, as it is your seam allowance.


Step 8: Pin the two halves of the rectangle PRECISELY, (right sides facing together) after making sure you rotate one half to create the pinwheel. I drive one guide pin up through the point of one rectangle, and then spear the second half again right through the other point, then line up the corners keeping the pin in place. With that center guide pin, you can then pin the rest of the side and know that, when you sew down that center seam, your points will be touching. I take out the guide pin before sewing-- I found that, when I laid it over to push through the rest of the fabric, it would shift the top over and the centers were no longer aligned. The photo shows the guide pin still straight up and down at the points before being removed, having already pinned the side in place. Sew with 1/4" seam allowance.


Step 9: Press the center seam open, and press it hard! I press first from the bottom, and then on the top side of the pinwheel. And VOILA! It's ready to sew as a square!


Just as an aside***
I had some fun arranging the initial split squares to see how they would look in other designs. The geometry can do some really fascinating things when aligned in various ways. Below is an accent pillow I MUST make to compliment the main pillow when this is done, as the colors will be the same palette, but wow, what a difference swapping out two corners of a pinwheel can make!


Below is the layout now for the bargello pillow, along with the framing strips sewn in place. There will be final strips on the outside of the pinwheels as well to anchor the sides, and then it will be time to quilt!!!


I will be back to post more soon, will put up a picture of the finished top before beginning to quilt it. Thanks for sharing this with me, it's exciting stuff! :)

Tuesday, August 16, 2011

Math Logic Fail


These are the bargello strips. I have already suffered from my lack of math logic, creating strips out of 9 pieces of 18"X20" fabric. See, I just kept thinking about the 2" widths, and that I would need a variation, might need more than two or three of each color, to make up for where the design would need to continue on a strip...


...But once I could see the piles of strips next to each other, it dawned on me...

I just cut up enough fabric to make a king-sized quilt, with matching pillowcases! Argh! Well, they ARE nice colors and Christmas IS just around the corner. Matching throw pillows anyone???

Wednesday, August 10, 2011

Summer Blues

It's just been brutally hot! Everywhere, not just here on the east coast, but really, can't wait for that first taste of fall. Now that it's August, it should be here soon...

Working on a bargello quilt design which I will post photos of shortly. I'm a little scared of the way you have to sew a tube, and then cut the strips from that, etc. Hard to find a good tutorial, and the written explanation has left me scratching my head without adequate pictures. Still, worst-case-scenario, I will have beautiful blue and peach/biege strip quilt cushion covers for my throw pillows. I can handle that. :)

And for the moment of the day, just had three crows walking around my overgrown backyard, picking at things in the grass, while I cut up rose hips to try my hand at some infused tea. It smells wonderful. What a bewitching slice of time, gazing at crows and preparing rosehips! Perhaps this will be a potion of courage for this quilt...

Tuesday, May 17, 2011

Oh, what wonders we do conceive when once we dare to sew up a sock!


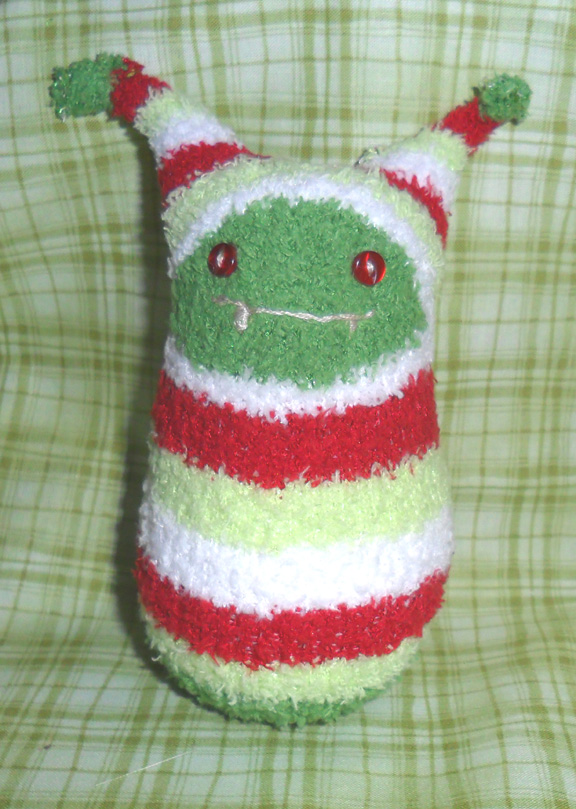
Having SO much fun making sock dolls recently! This wee monster came from a very plush baby sock. He's just a youngling, and his teeth are coming in all snagglie, and so that is his name... Snaggle. I have more to come, and I'm finished with two that just tickled me to make! It's as though they have their own little personalities that spring to life once they are sewn up proper.


They really like to go places, especially the babies...


I'm going to be sending him to my mom, who will take good care of him. She is the one who gave me the book on how to make them, and recommended the second one by the same author/sock artist, which I promptly purchased at JoAnne's Craft Store with my handy-dandy 40% off coupon. Gotta love a discount. I'll post a link to Amazon in case you're interested. I mean, there are so many ways to make these little guys, and I look at socks so differently now!

Anyway, don't want to go on too long, will post more pics soon and some info on how they're made. Yay! Go fun! Go creativity! Go making a little pet you don't have to clean up after! WOOO-HOOO!


Saturday, May 7, 2011

Little Mom's Day Bag

... And a happy Mother's Day to all the mom's out there! I'm a proud mother of one, myself, an 11-year-old boy, brilliant, kind, handsome... and no, I'm not just saying that because I'm his mom... ;-)

In true form to the holiday, I have completed a gift for my own mother the day BEFORE Mother's Day. I've been working on bags lately, stepping up my skills from decorative pillows and the like. This bag in particular is the first I've made where the handles are all one piece with the body, seaming the body in half. I learned a great deal with this bag, and can't wait to tweak the pattern to fit my needs.


Strap detail to show the pattern of the fabric better. It's pretty simple, but my mom likes things simple. Here are pics of the inside pockets:


The snap was my first, and not too hard to comprehend. I bought the matching 'snap kit' to go with the snaps so that the sizes for the tools were correct. The next time I use a snap, I'll be sure to attach it where there is interfacing. The inside and small exterior brown pocket have the interfacing in them, but not the entire purse.

I hope she likes it. She's very 'woodsy', and I get my love of natural colors from her. I lean on my more vibrant friends' tastes to remind me to pull out the brights every now and then! The weather is warm and sweet here in the south, and I can only hope that everyone has a great weekend like it's sizing up here. My thoughts are with the victims of the tornados as they face their first holiday without all the comforts of their home, and some without their loved ones. Keep your mother's love close, and your children's love even closer.

Friday, May 6, 2011

Gum Colored Fun

Welcome to this brand new blog – the long-anticipated (by myself) place where I can be nerdly to my heart’s content on all things craft-related in my life! I often have so many things going on at once that I thought it would be wonderful to catalog them somehow, make some ‘to-do’ with finished WIPs and notate progress. I’ve joined Ravelry and love it, but didn’t want to bog it down to much with my musings. Here, unfortunately for those who may read this blog, it is open season. I can only hope that some of the inspiration that strikes me so repetitively and in so many ways ( ie; quilting, making small handbags, crocheting, knitting, making amigurumi and sock dolls) might rub off on others of the same ilk. Yes, that means YOU. ;-)

For my first post, I would like to showcase a little project I started last night. You see, I’ve only just learned to knit, though I’ve been crocheting since I was a young girl. I’d tried dabbling with the knitting needles before, but became too impatient with the slow progress of learning and practicing what, in my mind, I could already accomplish using one crochet hook.

Now I’m older, and am sharing the learning with my best friend. And love the springy-ness of the work, the stretch that crochet doesn’t have. Case in point: Sugar ‘n’ Cream cotton yarn. The sweet colors have always caught my eye in the yarn section of either Hobby Lobby or Michael’s, but the one time I did try to crochet it, it was too tight around the needle, wouldn’t slide easy, had very little give, and always felt like I was trying to work with too little yarn. But given the nature of knitting and having my first make-shift hat under my belt, when I saw these little ‘Gum’ colored balls of cotton yarn on sale, I couldn’t resist.


And so now I am immersed in the epitome of the practice sampling: dishcloths. So far, I love how the yarn finally has some GIVE to it while I’m working with it, and how the knitting has been soothing my mind while I gear up to go into the unemployment office this morning. Yep, I’ll be one of those ladies who brings their knitting with them to a waiting area. I’m not yet old enough to wear a purple hat while doing so, but it’s in my future.

Enjoy the pictures, and next post I’ll be sure to have something I’m actually quite good at to show you. Feel free to point out any dropped stitches you may see…