Friday, May 1, 2015
Original Cross Stitch: Pink Rose Motif
...And here is the new Rose Motif! The colors are a little stronger than the violet, but I think they fit those pinks. My favorite pare are the outside decorations. I might try my hand at some Celtic knotwork down the road. Will work on getting these into PDF form to share the pattern. Making these is addictive, in between work shifts and loads of laundry and cooking dinner. A wonderful way to give a nod to spring flowers blooming all around. On to the next one! How about bluets?
Monday, April 27, 2015
Cross Stitch Original: Violet Flower Motif
With colored pencils, I sketched out a design on graph paper for a motif that represented the Spring we've been having. Creating my own design was so exciting! I've been working on a large sampler from The Frosted Pumpkin Stitchery, and wanted to try my hand at something original. This will not be the last! Playing the purples, golds and greens off each other sparked my imagination. It was worked on 18 ct. Aida cloth in Oatmeal. The next one will be done a bit bigger, I think. Hand-stitching is good therapy. ;-)
Friday, August 8, 2014
January Mouse; Amigarumi
This is a mouse I made for my mom, given to her for her birthday. The mouse's name is January, and I free-form crocheted her, though I'm working on a pattern. The felt is a bit fussy, but worth the trouble, I think. Her eyes are 'safety' animal eyes, and look much better in person. These shots aren't the greatest, but they get the point across.
I made a profile card for her as you can see below, and even sketched her on it. The story came to me while I was making her, and it was just a matter of writing a bit of it down for mom. She loves stuff like that, much like I do. :0)
She fit in a little drawstring bag, finished with love. I adore making gifts for people that I love... May you experience love in your crafting universe, too, after all... that's what it's all about, right?
Thursday, May 22, 2014
Harry Potter Potions, Candles and Oddities
I've been taking Potions, but of a different kind than the one Snape teaches. Although I wouldn't mind...
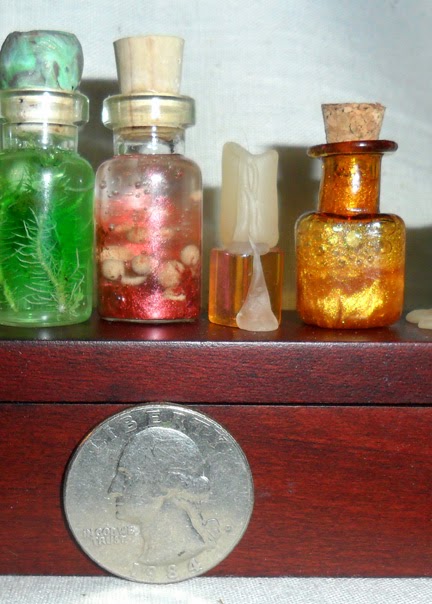
Ah, anyway! Yes, I have been dabbling a bit in the miniature potions bottles! From Left to Right; Dragon embryo suspended, Gillyweed, Dragonshade (a mix of my own, not in the books), a candle on a holder, Felix Felicus, a trio of candles like the one on top of the dragon embryo jar (which is not attached), and a second bottle of Gillyweed.
Felix Felicus, or Liquid Luck, was a shiny golden swirling potion, and the Gillyweed is a combination of food coloring in clear glue, and a snippet of moss that falls from my tree outside from time to time during a storm.
A quarter for size reference-- pretty small, and just so cool! Will be making more over the next few days, and will post progress. Hope you enjoy looking at these as much as I enjoyed making them!
Tuesday, May 20, 2014
Harry Potter - inspired Magic Miniature Box
...And in other miniature news, only of the smaller variety, and this time, themed...
I have been a Harry Potter fan for years and years-- was reading the books long before the movies started to come out. Like so many others, the story gripped me and hasn't let go of its magical spell yet. The books are still just as enchanting as when I first devoured them, and as I began to re-read them for the second time starting in January, all the way through, I began a project for my best friend's birthday in August. She, like me, holds these stories and characters close to her heart, and we both have read some- if not all- of the books to our kids.
In honor of her first introducing me to the world of Harry Potter, (among so many other awesome stories!) I am making her a 'Harry Potter Magic Cabinet'. It's a blank glass top 'collection' case I bought at Hobby Lobby, made of bare wood and the hardware, just waiting for adornment.
Below are the embellishments I've added to the outside, straight onto the wooden frame with Paper Clay, carved into with various tools and then painted.
Above is the bottom edge depicting a wand delivering the deadly curse Avada kedavra, while below is the bottom left corner with carvings leading up to Harry's telltale lightning bolt. In the center you can see the four compartments that will hold interpretations of the four Houses of Hogwarts. Those pictures will be coming soon.
Below is the bottom right corner with a closeup of the skull, and the bottom half of the snake...
Further up on the left side from the lightning bolt, there is a large dog paw print, perhaps belonging to a particular black shaggy dog Harry knows very well, and the symbol for the Deathly Hallows.
Top left shows the top right hand corner, depicting a dragon. Below shows the top left hand corner, with a troll in profile and some runes etched in around him.
Between the troll and the dragon at the top is a raven's wing.
The Paper Clay held up amazingly well to paint, and the top was lightly rubbed with a pale grayish-green hue to really bring out those carved details. The box has taken on the look and feel of something ancient and magical now. I'm so in love with this project, I cannot wait to start one for myself! More to come...
I have been a Harry Potter fan for years and years-- was reading the books long before the movies started to come out. Like so many others, the story gripped me and hasn't let go of its magical spell yet. The books are still just as enchanting as when I first devoured them, and as I began to re-read them for the second time starting in January, all the way through, I began a project for my best friend's birthday in August. She, like me, holds these stories and characters close to her heart, and we both have read some- if not all- of the books to our kids.
In honor of her first introducing me to the world of Harry Potter, (among so many other awesome stories!) I am making her a 'Harry Potter Magic Cabinet'. It's a blank glass top 'collection' case I bought at Hobby Lobby, made of bare wood and the hardware, just waiting for adornment.
Below are the embellishments I've added to the outside, straight onto the wooden frame with Paper Clay, carved into with various tools and then painted.
Above is the bottom edge depicting a wand delivering the deadly curse Avada kedavra, while below is the bottom left corner with carvings leading up to Harry's telltale lightning bolt. In the center you can see the four compartments that will hold interpretations of the four Houses of Hogwarts. Those pictures will be coming soon.
Below is the bottom right corner with a closeup of the skull, and the bottom half of the snake...
Coming up the right hand side is the rest of the snake, with a clock face embedded near the latch.
Further up on the left side from the lightning bolt, there is a large dog paw print, perhaps belonging to a particular black shaggy dog Harry knows very well, and the symbol for the Deathly Hallows.
Top left shows the top right hand corner, depicting a dragon. Below shows the top left hand corner, with a troll in profile and some runes etched in around him.
Between the troll and the dragon at the top is a raven's wing.
The Paper Clay held up amazingly well to paint, and the top was lightly rubbed with a pale grayish-green hue to really bring out those carved details. The box has taken on the look and feel of something ancient and magical now. I'm so in love with this project, I cannot wait to start one for myself! More to come...
Thursday, May 15, 2014
Ever After High Re-Paint, Re-Done!
A new commission, and a new form of art.
I took the factory face paint off with non-acetone nail polish remover, and worked on her new face with pastels, water color pencils, acrylic paints, and sealed her multiple times with Mr. Super Clear Flat spray fixative.
I couldn't be happier with the re-paint of this Ever After High Doll! Just finished it for my Aunt, commissioned by my mom, and she has turned into such a sweet thing.
I took the factory face paint off with non-acetone nail polish remover, and worked on her new face with pastels, water color pencils, acrylic paints, and sealed her multiple times with Mr. Super Clear Flat spray fixative.
I then went to work on making her dress, a custom crocheted shawl, and felt Mary Jane shoes. She's holding a small Bible, also, in keeping with the theme. The clothing is getting a little bit easier to make, but is still fussy! The shoes were my first attempt with a technique I learned about on YouTube, by MyFroggyStuff. I combined some of her tricks and added a bit of my own, and am pleased with the way the felt melds with her pre-formed feet, which are factory made to fit into extreme high heels, as per the normal attire for these dolls.
One of the most exciting things I've made for someone! I'm gonna go work on my own Monster High re-paint now... Just what I needed. A new hobby. :-)
Monday, February 24, 2014
Toofs - A Crochet Monster
Meet Toofs! He is a brand-spankin' new crocheted monster, and a successful conglomeration of several techniques I have been accumulating lately. He has 'safety' eyes, embroidered felt accents, and hinged arms and legs for better depth of expression. And believe me, Toofs has a lot to express!!!
You can see here that his lanky arms are perfect for crossing, either in a huff or deep in thought about the things he would like to try to bite later on...
Above is a detail picture of his foot pads, and his crocheted fingers, naturally curling under to appear to 'grasp' things.
A look of surprise!
The mouth is an opening in the crochet cylinder of his body, so that the felt envelope sewn inside of it resembles an actual mouth. That and the comical ears give him a fun profile, I think.
Sunday, November 24, 2013
Dollhouse: Let there be LIGHT!
In these photos, you can also see the wainscotting is up, and the chair rail, and everything has been aged. I glued a victorian style fabric to the walls and then aged them in all the corners, and it ended up giving it the perfect atmosphere. I haven't finished the chair rail on the right due to the fireplace surround needing construction before I know where that piece of trim will fall. There will also be trim around the ceiling and baseboards, and a hardwood floor installed. There will be another light on the left hand side as well, but will look differently as this is more of a 'kitchen' area, and I need it to be brighter there.
The big hole on the left is the opening for the bay window.
And then I discovered the thrill of finding minis for sale on Etsy! These were purchased by Green Gypsies- what witch's cottage would be complete without a set of Harry Potter books??? I also have plans to include many of the books that I loved over the years, but may try my hand at making a few of my own.
The Tarot cards she sent me are perfect! So small and delicate, and exact in detail and scale. These will look wonderful next to the crystal ball I will be making! Below is a Sheep and Willow rug that just drew me in-- it may go in the kitchen area.
And for a final update on the house as a whole, below I have shown how the 'copper' window pediments have been aged for copper patina. It looks better in real life, the green sort of washed out here. You can also see the aging of the exterior in this picture. After getting the lights in place, I'll be working on the flooring and getting the roof on. I will, of course, keep it posted! I hope you enjoy this process...I know there was nothing like the feeling of seeing that little light come on through the windows of the house.
Tuesday, November 12, 2013
My Cottage Project: The Orchid Dollhouse
Above is my new workspace in the corner of my bedroom. I made the table, and then have been working on the shown dollhouse for about two months now, in between everything else. It comes from the Greenleaf Collection, called The Orchid. It's a Victorian-style, two level, four room house. Very cozy, and perfect to dress as a witch's cottage. Below are the panels thus far, set out the way they will go together once assembled.
Flipping the gable and dormer window panels over, you can see the distressed finish that I will be applying to the entire upstairs bedroom/bathroom area. I glue paper down, then after it bubbles but is still a little not dry, I tear it off, then paint it, then distress it. I've put an aged shading around the windows for greater 'old' effect.
Above are some little polymer clay items I made after watching demos on youTube, to make bread, sliced and braided and large round loaves, an apple and a skull in the background. I'll post these again after I've painted them.
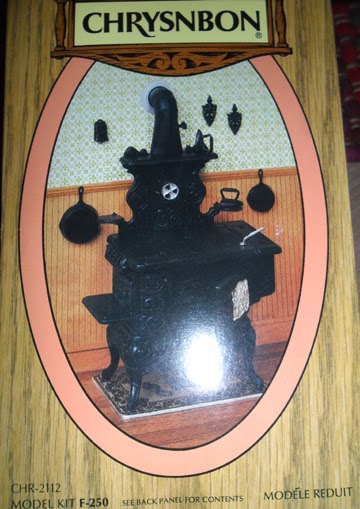
The stove above will be in the bedroom for heat, though there will be a fireplace on the bottom floor in the living area. The rocking chair will probably go downstairs. Below is the antique kitchen stove and accessories that I will be assembling for the kitchen.
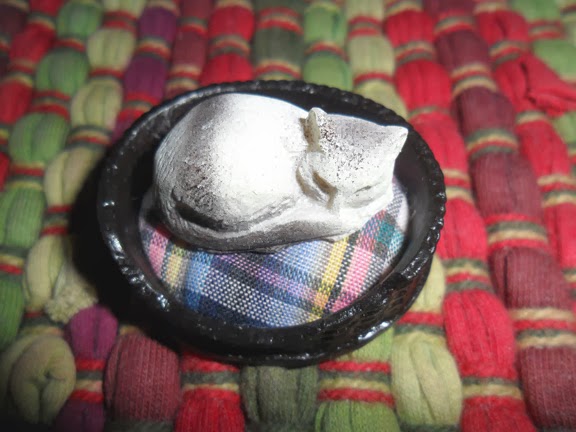
Lastly, the little kitty in a basket that I found. I will be re-painting her before long.
I am LOVING this process, even though it is an exercise in tedium. I am faithfully sanding all of the edges before painting them, and also sealing the woodwork with a satin finish to help it stand out. I will be aging the outside of the house, also, and adding a stack stone chimney for the fireplace.
So much to do... so happy to do it! :)
Subscribe to:
Posts (Atom)